Welcome to Slider Maker - jQuery Photo Slideshow Maker
Visual User Interface to build Layered Sliders, Galleries, Carousels, Slideshows
- created: 2016 03 07
- latest update: 2022 04 19
- by: Gilles Migliori
- email: gilles.migliori@gmail.com
Slider Maker is a ready-to-use package.
Please follow the quick Start Guide and you'll begin to create your first sliders within minutes.
For update instructions, please refer to update Slider Maker section.
If you have any request, need any help, want to ask for new features, ... please :
- - email me at gilles.migliori@gmail.com
- - or post comment on Codecanyon.
Quick Start Guide
Be sure your server runs with PHP 5.3 or higher
(you can check this usingphpinfo();)- Copy slidermaker folder on your server :
- slidermaker
- admin* required *
- assets* required *
- documentation* not required *
- php* required *
- sliders* required *
- conf.php* required *
- index.html* not required *
- slidermaker
- admin* required *
- assets* required *
- php* required *
- sliders* required *
- conf.php* required *
- slidermaker
- Open admin/secure/install/do-install.php if you want to use Authentication module
(else disable Authentication module) - Open admin/index.php and start building your sliders
- Open Configuration File for global configuration (optional)
Wordpress & CMS users
Slider Maker can be used with Wordpress, Joomla and any other CMS if your CMS allow you to add code in the head and body parts of your page.
Here is how to proceed:
- Create your jQuery Slideshow with Slider Maker
- The code to paste in your page is available in the "Publish" tab inside Slider Maker's admin panel
- Paste the code inside the <head> & <body> part of your page following the "Publish" tab instructions
Depending on your CMS, you may have to add an external plugin to be able to add code inside the page's <head>.
For Wordpress users, this plugin is a good one: https://wordpress.org/plugins/per-page-add-to/
Authentication module
Slider Maker can be used in several different ways.
Local admin
Build your slideshows using admin only from localhost, and upload them on your production server.
In this case, you don't have to use any authentication as admin panel will not be uploaded on production server.
Server admin with authentication module
Upload admin directory on production server and install authentication module. This way you can build your slideshows from server and keep maximum security.
Use any other authentication module
If you want to integrate Slider Maker in another existing admin panel, just add your custom security code at the beginning ofslidermaker/admin/
How to install Authentication module
- Open
slidermaker/admin/secure/install/do-install.phpin your browser - Enter any username and password
- Done !
How to disable Authentication module
- Open
slidermaker/conf.phpin your favorite code editor - replace
define('SECURE_ENABLED', true);withdefine('SECURE_ENABLED', false); - Done !
How to edit your username / pass
- Delete
slidermaker/admin/secure/install/install.lock - Open
slidermaker/admin/secure/install/do-install.phpin your browser to run install
Main Screen (Explorer & medias)
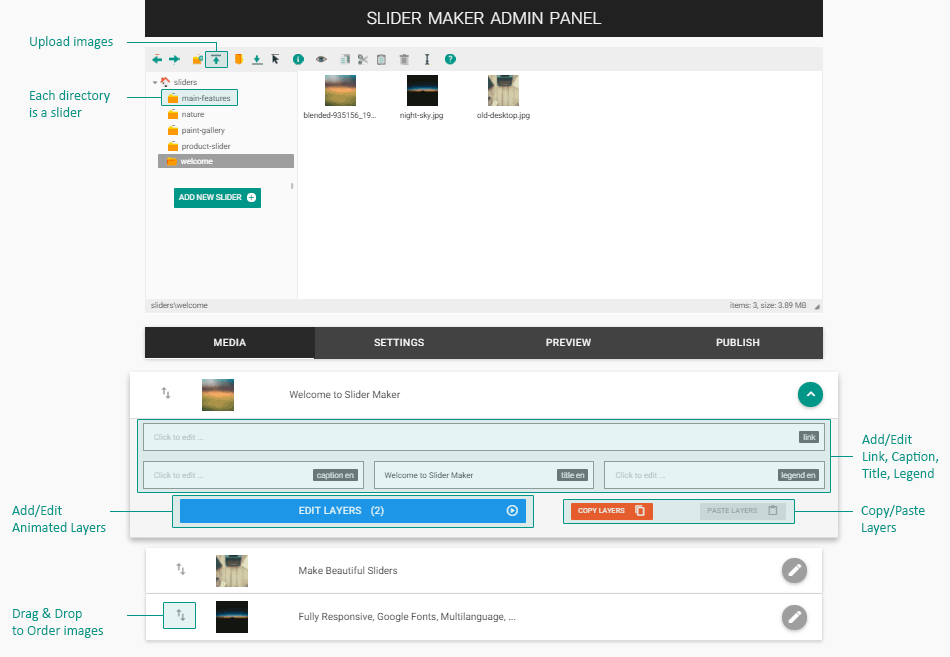
Layers Screen (Multilingual animated layers)
Settings (admin Settings tab)
All of these are Global Slider Settings available in admin Settings tab
- Add / Remove languages
- Enable/Disable Text :
- Captions
- Layers
- Titles
- Legends
- Links
- Play Mode (Autoplay, Loop, Shuffle ...)
- User Interface (Theme, Buttons, Arrows, ...)
- Thumbnails (Enable/Disable, Size, Position, Arrows, ...)
- Sizing (Width, Height & Scale mode)
Settings are explained with tooltips when required.
You can disable these tooltips in main Configuration File.
Preview (admin Preview tab)
Preview your slider and choose your theme here
Selected theme in dropdown list is registered as your chosen slider theme in real time.
Background is only for preview purpose and is not registered.
Publish (admin Publish tab)
Just Copy/paste the code in your page to render your slider
Nothing more to explain !
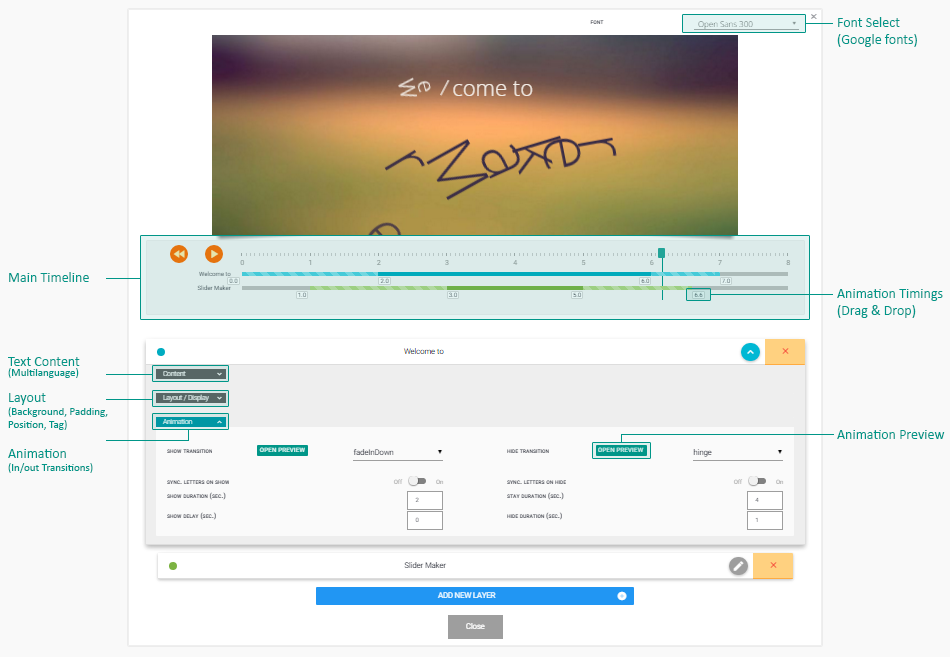
Animated Layers (admin Media tab - Add/Edit Layer buttons)
Styling specific animated layers
Layers accept inline tags and classes. Here is an example :
    // Layer content
    <span class="my-style">Here</span> is the <strong>layer text</strong>

    // css
    .my-style {
        font-family:"Product Sans"; // this way you can use several custom fonts in the same slider
        color: #009688;
    }
Icons & non-lettered elements
Letters are separated into individuals span elements for animation.
In specific cases you may want to keep them united (to use icons for example).
Just wrap your content with a span (or another inline tag) and add nosplit class :
<i class="material-icons nosplit">play_arrow</i>Tooltips over layers
Styling specific animated layers
- First create your slideshow, open image details in image list (in Media tab) and click "Add New Layer" button
- Add Tooltip code in your layer content :
Where :<div class="nosplit"><a href="#" id="my-tip-1" class="tip-btn tooltipped" data-position="left" data-delay="50" data-tooltip="I am tooltip"></a></div>my-tip-1can be any unique iddata-positionis the position of the tooltip (top|right|bottom|left)data-delayis the delay in ms before tooltip appearsdata-tooltipis the content of your tooltip
- Add this sort of css to place & customize each tooltip :
/* buttons over images */ .sp-slide .tip-btn { position:absolute; width: 15px; height: 15px; border: 2px solid #fff; background: rgba(255, 255, 255, 0.3); border-radius: 50%; } /* tip placement for each tip using unique id */ .sp-slide #my-tip-1 { top:25%; left: 12%; } /* tooltip content */ .material-tooltip { font-family: "Roboto"; font-size: 14px; text-shadow: 0.5px 0.5px 0 rgba(255,255,255,0.6); font-weight: 400; color: #333; -webkit-box-shadow: 0 0 2px 0px rgba(50,50,50,0.3); box-shadow: 0 0 2px 0px rgba(50,50,50,0.3); } /* tooltip background */ .material-tooltip .backdrop { background: rgba(255, 255, 255, 0.7); } - Add Slider callback to enable tooltips (in this example slider is named "my-slider") :
(see Javascript Callback for details about callback function)var sliderMySliderCallback = function () { setTimeout(function() { // enable tooltips $('.tooltipped').tooltip({delay: 50}); }, 1000); };
Configuration File
Open /slidermaker/conf.php in your code editor to change root configuration :
- TOUR_ENABLED
- Adds the 'Take a tour' button to admin page and enables tour features
- TOUR_AUTOLAUNCH_ENABLED
- Auto-launch guided tour on admin page load - no effect of course if previous option is set to false
- GOOGLE_FONTS
- Enable / Disable Google fonts
- LANG
- admin language
- TOOLTIPS_ENABLED
- enable / Disable admin tooltips
- LOG_ENABLED
- enable / Disable logs in
/slidermaker/admin/log - RETINA
- enable retina images - set to false if you encounter performance issues
- IMG_QUALITY
- image quality - from 0 to 100
- ERROR_INVALID_DIRECTORY
- error if directory doesn't exist
- ERROR_DOC_WIDTH
- error if document width transmitted to php isn't numeric
- ERROR_INVALID_INDEX
- error if invalid index transmitted to php
2nd part of configuration file defines all defaults settings for new sliders / layers.
Javascript Callback
Once slider is loaded and ready to start it will automatically look for a callback function.
To create your callback function, name it this way :
slider + slider's folder uppercamelcase name + Callback
/* example with a slider folder named "demo-folder" */

var sliderDemoFolderCallback = function () {
    $('#slider-div').animate({'opacity': 1}, 400);
};
This can be especially useful to fade in your slider once loaded.
customizing (Styles & themes)
Slider Maker is built with Materialize, based on Google Material Design.
It comes with 4 prebuilt themes (Default, Clean, Smooth & Square)
Each theme is declined in several Material Design colors.
Customize with SASS
You'll find scss files in /slidermaker/assets/scss.
It contains 2 subdirectories :
- core
- common base properties used for all styles
- components
- base components (arrows, buttons, captions, thumbs., thumb. arrows, thumb. pointers) for each style
A single file for each style defines variables (colors, ...) and uses core + corresponding's style components
Customize with css only
Just choose a base file and customize regarding to your needs.
Targeting a specific slider for custom styles
Each slider has a specific ID : slider- + [dir-name] + index
Each layer has specific ID : image-filename + layer-index
For example, if your slider (directory) is named creative-agency, and the image people-coffee-notes-tea.jpg has 3 layers, you can target the 3rd layer this way : (first layer index is zero)
// targeting people-coffee-notes-tea.jpg's 3rd layer in creative-agency slider :
#slider-creative-agency .people-coffee-notes-tea2 {
    font-family: Roboto;
    font-weight: 400;
    width: 40%;
    max-height: 40%;
    overflow: ellipsis;
    white-space: normal;
    line-height: 1.5em;
}
Updating package
Your license allows you to get lifetime updates
To update Slider Maker to newest version :
- Backup your
slidermakerdirectory - Replace your
slidermakerdirectory with the new one - Replace
slidermaker/sliderswith your old one to get your sliders back in new installation
Translation
To translate User Interface:
- Duplicate
/slidermaker/admin/i18n/sm.en.php, translate content into your language, then save your file assm.ln.php, where ln is your 2 letters ISO country code.
You'll find all available 2 letters ISO country codes in/slidermaker/admin/assets/js/languages.json - Open
/slidermaker/conf.phpin your code editor and set admin language (LANG) to your language. - You're welcome if you agree to share your language file - please find contact at the top of this document.
Additionally you can translate :
- /slidermaker/admin/assets/lib/elfinder2x/js/i18n/elfinder.[lang].js (filebrowser)
- /slidermaker/admin/assets/lib/colorpicker/i18n/jquery.ui.colorpicker-[lang].js (colorpicker)
Changelog
Version 1.5.3 (2022-04-19)
    Bug Fix :
        - add a missing ending slash in the data-root
Version 1.5.2 (2018-12-13)
    Improvements :
        - add autoplay support for videos
    Bug Fix :
        - solve jQuery $ potential conflict
        - fix Vimeo URL change
Version 1.5.1 (2018-08-07)
    Bug Fix :
        - fix Redirection after login
Version 1.5 (2018-05-18)
    New Features :
        - add carousel switch in settings
    Improvements :
        - add autoplay support for videos
    Bug Fix :
        - fix Vimeo URL change
Version 1.4 (2017-05-09)
    New Features :
        - cross domain support :
          use same slideshows built with a single admin panel on external websites & domains
        - add support for youtube and vimeo videos
    Improvements :
        - improve javascript code and performance
        - add logout button
    Bug Fix :
        - fix several minor bugs
Version 1.3.2 (2017-01-18)
    New Features :
        - Add new template with tooltips on hover images
Version 1.3.1 (2017-01-02)
    Improvements :
        - Update image list without refreshing page on settings update
        - other minor improvements
Version 1.3 (2016-12-13)
    Bug Fix :
        - fix pause on mouseover non working
    New Features :
        - add Secure module with Login page
        - add new Templates
Version 1.2 (2016-11-21)
    Bug Fix :
        - fix php warning in ElFinder
    New Features :
        - add "Ken Burns" effect
        - add new Templates
Version 1.1.2 (2016-07-23)
    Bug Fix :
        - solve error using Imagick
        - delete all server image files when removing image from slider
        - correct layers font size error from int to float
    Improvements :
        - add "Add New Image" button in images browser
        - add new Templates
        - improve included Templates
Version 1.1.1 (2016-07-14)
    Bugs Fix :
        - correct non-working guided tour with custom languages
        - correct layers edition bug due to previous update
    Improvements :
        - improved several sizing behaviour
Version 1.1.0 (2016-04-25)
    Improvements :
        - optimize several files/settings/script for even faster page loading
        - add ENVIRONMENT (development/production) in conf.php
        - use of original unminified js/css in development mode
        - use of compacted minified js/css in production mode
        - add default environment : development on localhost, production on server
        - improve responsive behaviour, optimize calculations
        - improve security :
            - add Content-Security-Policy
            - improve uploaded file checking (mime type)
            - block php execution in slider's dir
Version 1.0.1 (29/03/2016)
    Bugs Fix :
        - Fix non-working loop
Version 1.0 (2016-03-22)
Initial Release
Source & Credits
Thanks so much to :
- http://draggabilly.desandro.com
- http://elfinder.org
- http://github.com/tommoor/fontselect-jquery-plugin
- https://github.com/tuupola/jquery_jeditable
- http://materializecss.com
- http://kamranahmed.info/toast
- http://refreshless.com/nouislider
- http://vodkabears.github.io/remodal
- http://bqworks.com/slider-pro
- http://textillate.js.org
- http://vanderlee.github.io/colorpicker
- http://codecanyon.net/item/create-tutorials-that-guide-visitors-around-your-site/10354002
All demo images are free for individual / commercial use, from :